Last Updated on May 23, 2020 by gregor
In this Blog post I will show you a selection of the most famous Instagram spots in Vienna City Center. Since I am a mobile photographer the focus of this article will be to show you the best spots and help you to edit the photos for your perfect Instagram Feed & Stories
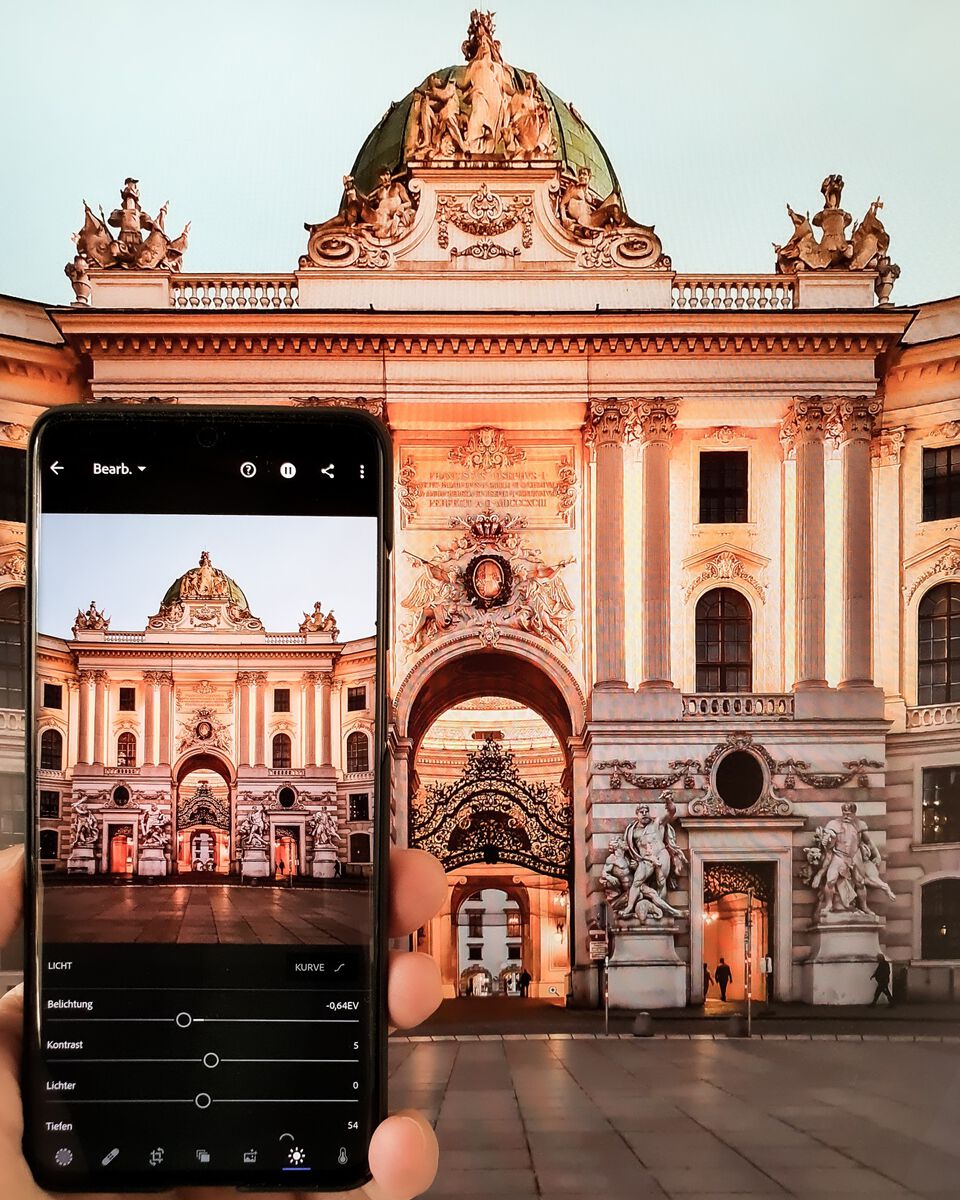
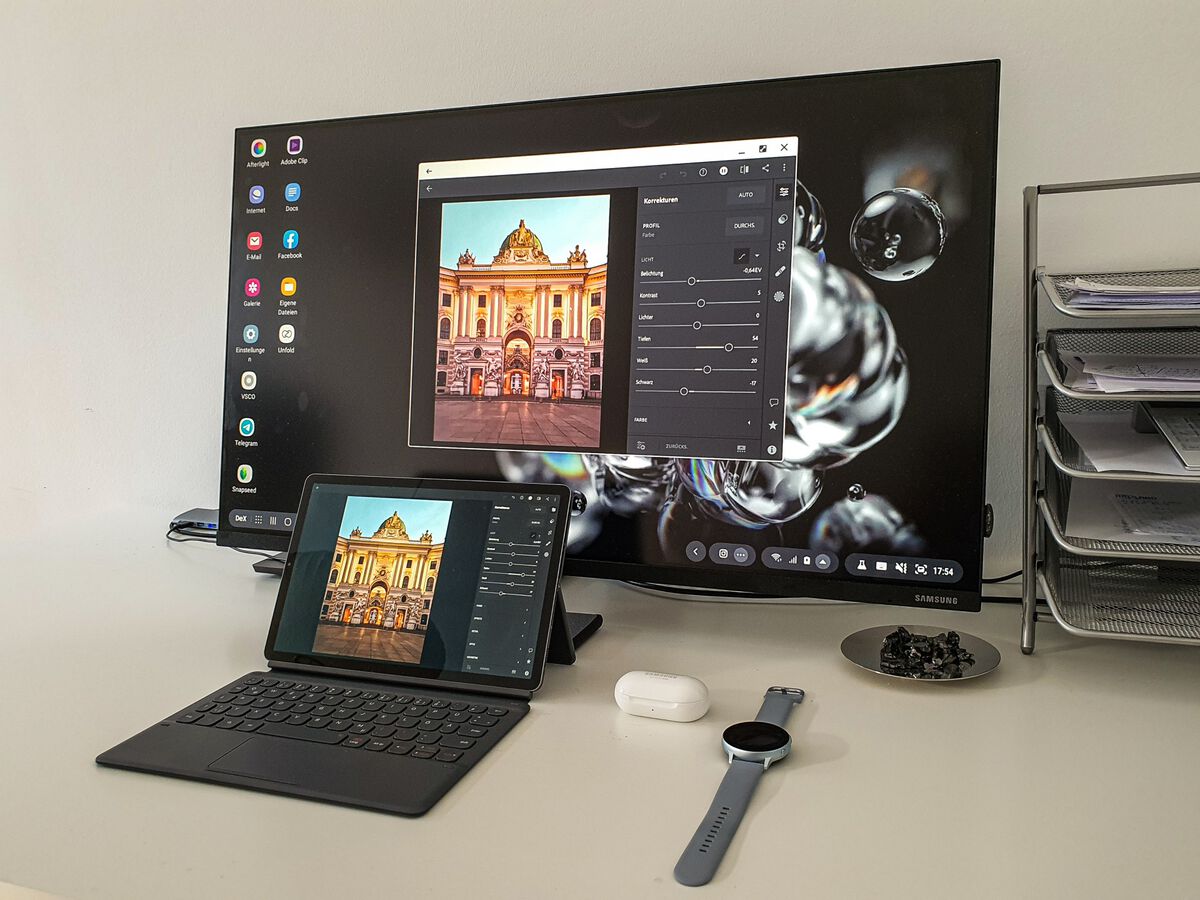
All photos are taken with the Samsung Galaxy S20 Ultra. All photo editing was done on this smartphone and on the Samsung Galaxy Tab S6.
Perfect Instagram Moments in Vienna photographed and edited with the Samsung Galaxy S20 Ultra
Here are the Top Five Instagrammable places in the City Center of Vienna
Vienna Opera


Left: Original (unedited) _ Right: Edited with Adobe Lightroom CC on the Samsung Galaxy S20 Ultra
Vienna – Sacher Hotel


Left: Original (unedited) _ Right: Edited with Adobe Lightroom CC on the Samsung Galaxy S20 Ultra
Vienna Albertina Museum


Left: Original (unedited) _ Right: Edited with Adobe Lightroom CC on the Samsung Galaxy S20 Ultra
Vienna Volksgarten


Left: Original (unedited) _ Right: Edited with Adobe Lightroom CC on the Samsung Galaxy S20 Ultra
Vienna Michaelerplatz


Left: Original (unedited) _ Right: Edited with Adobe Lightroom CC on the Samsung Galaxy S20 Ultra
Please see my Blog post Here are the Top 10 reasons why Samsung Galaxy Tab S6 is the best for mobile content creators and creative travelers

How to Edit Photos for Instagram with the Samsung Galaxy S20 Ultra using Adobe Lightroom Mobile
What is Adobe Lightroom for mobile?
It is one of the best photo editing apps available on your smartphone; it does not not matter what operating system you use, it works just as good on both and can bring forth some impressive results. However, the issue that comes forward is that due to the app being primarily for photographers, many beginners are afraid of trying to try it because there are just so many options available for you to mess around with.
Now, the good thing is that the app is free; you can simply download it and get started with photo editing.
The free version of the app actually contains almost all the features you need to edit your Instagram pictures. Merely a selective adjustment of the image with linear or radial masks is not possible.
Even the gradation curve is included in the free package. If you want to learn more about it, you can find all the information here and in your app store. https://helpx.adobe.com/de/lightroom-cc/how-to/lightroom-mobile.html
Step 1: Choose a Photo to Edit
Click on the photograph button with the plus sign at the bottom right of your screen to open a new photo now.
I’ll show you how I like to edit with Lightroom using the photo below as an example. Here’s a comparison of what it looked like before and after editing!
Left: Original (unedited) _ Right: Edited with Adobe Lightroom CC on the Samsung Galaxy S20 Ultra
Step 2: Photo Editing Tools available
To give you a better understanding of what I’m talking about, we’ll go over some Adobe Lightroom CC features and basic photo editing terms now.
Choose from an Auto adjustment or other tools to make adjustments including:
- Light: Exposure, Contrast, Highlights, Shadows, Whites, and Blacks
- Color: White Balance, Temp, Tint, Vibrance, and Saturation
- Effects: Clarity, Dehaze, Vignette, Midpoint, Feather, Roundness, Highlights, Grain, Size, and Roughness
- Detail: Sharpening, Radius, Detail, Masking, Noise Reduction Contrast, Color Noise Reduction, Smoothness
- Optics: Remove Chromatic Aberration, Enable Lens Corrections
- Geometry: Distortion, Vertical, Horizontal, Rotate, Aspect, Scale, X Offset, Y Offset
- Presets: Choose from filters created by Adobe including Color, Creative, B&W, Curve, Grain, Sharpening, Vignetting or User Presets that you can either create on your own or download through Etsy or Creative Market
Step 3: Lightroom Auto Adjustments
The Lightroom Auto adjustment feature will do the work for you and is a fantastic option if you’re unsure as to how to start editing your shot; it’s also a great way to see how the controls work and what tools make what sort of adjustments for those who are brand new to photo editing.

Above is a comparison of the adjustments Lightroom automatically made for this photo versus the original. Not much of a difference here!
Step 4: Make Light Adjustments
- Exposure: Adjusts how light or dark you’d like your image to appear
- Contrast: Adjusts for differences in the mid-tones of your image
- Highlights: Recovers details in overexposed highlight areas
- Shadows: Recovers details in underexposed shadow areas
- Whites: Adjust white points in your image
- Blacks: Adjust black points in your image
This is the natural first step for photo editing!
Normally, the most dramatic difference of all will be a result of your Exposure adjustment.

Now, we’re getting somewhere! It’s incredible how adjusting exposure alone can make a photo appear so different than it did before.
Step 5: Adjust the Contrast, Shadows
- Contrast: Adjusting the contrast of a photo is a little similar to adjusting the brightness, except you’re focusing on the darker tones of the image — increasing or decreasing its strength.
- Shadows: Shadows are something I tamper with pretty moderately because if you overdo it, you risk pixelating your photo and lowering the quality. Shadows should only be adjusted to complement the adjustments already made with the brightness of the photo.
Step 6: Make Color Adjustments
- Temp: Adjusts color temperature of your image
- Tint: Adjusts for green or magenta color in your image
- Vibrance: Adjusts the intensity muted colors without affecting already-saturated colors
- Saturation: Adjust your image’s vividness
Playing with the saturation is the easiest way to set a photo apart, but this step MUST NOT be overdone as well. If rainbow diarrhea is your style, then more power to you, but again, like every other thing in life, it’s best to practice in moderation.

Step 7: Change Effects
- Clarity: Adjusts your image’s depth – how textures appear
- Dehaze: Adjusts your image’s existing haze
- Vignette: Reduces your image’s brightness and saturation at its edges
The clarity of a photo is like a mix of sharpening and adding contrast to an image. Depending on the setting of the photo,
Step 8: Make Selective Edits
The Selective feature is hands down my absolute favorite tool when it comes to Instagram photo editing! It gives you complete control over every little detail of your image.
To start the tool up, click on the Selective Tool in the main menu. Then press the Plus Sign to see your options. Choose the Brush Tool and paint over the area you’d like to edit.
Step 9: Save / Export to your Camera Roll
Choose from the options listed above and either Share, Save to Camera Roll, Save to Files, Open In, Edit In, or Export Original. If choosing Save to Camera, maintain the best resolution by selecting the Maximum available from the Image Size options listed above.
And there you have it! You’ve just finished editing the first photo for Instagram using Lightroom on a mobile device!
My Verdict
Mobile Photo Editing for Instagram on the Samsung Galaxy S20 Ultra and the Samsung Galaxy Tab S6 is really fast and easy.
I previously used a combination of M5 and/or S1 in VSCO but this was only after having finished my edit on Snapseed. After making the upgrade to Lightroom for Instagram photo editing, my images feel as much crisper as they did before!
What’s your favorite feature in the Adobe Lightroom? How will you use the gorgeous images you create in Lightroom?
I’d love to hear from you in the comments below.
Happy editing, friends!
Gregor
Find out more about the equipment I used for this Blog-Post:
Samsung Galaxy S20 Ultra
More Information on the official Samsung Website (Please Click on the Link) http://bit.ly/S20_st_greg
Samsung Galaxy TAB S6

More Information on the official Samsung Website (Please Click on the Link below)
https://www.samsung.com/at/tablets/galaxy-tab-s6-t865/SM-T865NZALATO/
Samsung Space Monitor
More Information on the official Samsung Website (Please Click on the Link below)
https://www.samsung.com/at/business/monitors/uhd-monitor-the-space-sr750/ls32r750ueuxen/
Samsung Galaxy Watch Active2


More Information on the official Samsung Website (Please Click on the Link below)
https://www.samsung.com/at/wearables/galaxy-watch-active2-r830/SM-R830NZSAATO/